Recent: McCulloch gladiator 550?

Mend Grohe Toilets

Mend D.I.Y, Toilets
Find out how to mend it for free.

Ask Question
Mend D.I.Y, Toilets
Free repair help for Grohe toilets

Mend > Toilets

Mend D.I.Y, Toilets

my Grohe cistern (called Grohedal) does not completely stop the water?

Flushing the toilet is in order (push button - remote) but when the cistern has refilled there is a continuous trickle of water into the toilet - if there is a small piece of grit near or in the valve how do I dis-assemble the valve to clear it?

John Ross
June 2007
Thanks to Roger C for suggesting that the problem might be limescale. Tried everything to stop the slow leak down the back of the pan, then saw your idea on how to remedy the problem. I wasn't brave enough to use kettle cleaner, so used a Stanley knife and Viakal. Seems to have sorted the problem, so fingers crossed! Just one point, limescale is a devil to see, so just feel the top of the outlet pipe to see if it's a bit rough.

Tony L
October 2020
Same problem. Grohe Adagio continually running water, was a trickle a year ago, now a flow. I tried all the usual stuff (descale the flush valve, new flush valve assembly etc) but did not solve for more than a day or so. Further investigation (taking photos using my phone) showed signifcant limescale build up within the valve seat at the top of the down pipe at the base of the cistern; this limescale prevented the drop valve part of the flush valve from dropping and sealing. The drop valve has guide 'prongs' on it that engage into this valve seat, and the limescale was preventing this.

Solution was to use an old fluffy 38mm paint roller with the end dipped in a warm 50-50 Kilrock solution (a very strong descaler - so use appropriate safety measures). The end of the roller fits neatly into the drop valve socket so the Kilrock can ooze down and do its work. Twiddle the roller every few minutes; dip and repeat and twiddle a number of times over 3/4 of an hour. This cleared the limescale completely.

The flush valve now seals properly as designed. No more running water.

Roger C
May 2020
Mine has neoprene seals. I cleaned it and fiddled with it...ok for a bit. I had previously paid plumbers almost £100 over 4 visits to do this - works for a while then starts leaking again. The syphon is not heavy enough to make a good seal. I used a small round plastic lid with a coin sellotaped to it and used blu tack to stop it moving. It works. Obviously, I can use weatherproof sealant for a more proffesional job!

AliT
January 2020
As with all similar systems that rely on a soft plastic seal to rigid plastic pipe the answer is to smear silicone grease over the seal[s] and instant success unless there is obvious damage. I have just done that to a Grohedal unit [both seals - unscrew the red plastic part a fraction of a turn and pull off to reach the other one], You can get the silicon grease from a plumbers shop - smallest pot you can get. Before I did this I was losing the whole cistern full of water in less than an hour - cant wait to see my water bill.

Joe E
July 2016
Have had an ongoing problem leakage with bottom part of flushing and have nailed it to breakdown of bottom washer that lays on the cystern. This has been replaced 3 times with the white unit (was green). Sad that Grohe does not supply new washers alone but only in the £7 unit. It seems that the unit is not heavy enough to bed with a good seal.

Mike W
December 2012
I dismantled the piston and cartridge. Took out the two washers in the cartridge. ( Just twist the red bessel until it lifts out ) Everything looked fine - no blisters,, no debris, no apparent reason for the problem. I put the whole thing carefully back together making sure that the washers were not turned over and I smothered the washers with washing up liquid. I think that helps them to seat correctly. The problem seems to be fixed now but if it turns out that it is not. The fact that doing some work on the washers in the cartridge fixed the problem gives me confidence that if I do have to replace anything it will only be the cartridge - no need to replace the whole piston

Billy
October 2012
Only if your are in S'pore and need a new GroheDAL Discharge Piston valve control for your Cistern to stop water leakage, pls email tanyijia at gmail.com.

YiJia
June 2012
And here's a follow up which tells you how to distinguish between the old (bad) silicone and the new (good) neoprene.
Grohe only sell complete piston units, cost £12-50 inc VAT & postage

Copy follows:-
If the piston you purchase is white then the seals are made from Neoprene, if it is green they are made of silicone.
This you can purchase from us 0871 200 3414 and press option 3.
The piston as it’s part of a product comes with a 1 year guarantee.

John C
June 2012
I got an email reply from Grohe that they've changed the washer material from Silicone to Neoprene.
Cut/paste copy follows:-

The seals can be replaced, if you have an adagio cistern then the code is 43544000.

The seals which are contained within your cistern we made by DAL ,whom we then took over and changed the material of the seals from silicone to neoprene.

John C
June 2012
Does anyone have a picture of how the flush fits inside this cistern? The flush on mine has come away from wherever it clipped onto. Cheap plastic fittings!

Debbie Richardson
February 2012
Thanks for all the advice. Clearly, my cistern has been slowly leaking for a couple of months judging by meter readings. I got it apart and cleaned it all, spotted an obvious lump on the seal and came on here for help. Now I know it is a blister, I've pricked it and ordered replacement seals.

Paul
December 2011
Hi, I have a system that fills up constantly do but I think it is the basket that the flush valve sits in as when I remove the flushvalve and test with small amount of water it seeps into the bowl. I dont know if I need a new seal or the whole basket but I cant find either anywhere. Can anyone help? Thanks

Rich E
November 2011
easy remove the cover plate,unscrew the 4 holding screws and remove plastic frame.turn water off.take out discharge piston by turnig anti clockwise about quater to half a turn just like a bayonette fitting lift out replace the bottom seals part number 43544 this just clips out of the bottom.then replace.

jud
November 2011
Does anyone have a diagram of the complete system i can work from? the actuall flush button is not connected to the cistern but is situated over two meters away fro the system mounted on the bathroom wall. am i just missing a rubber tube?

Any help would be great :)

DazedandConfused
October 2011
I bought two sets of washers from (Grohe Replacement Syphon Washers ( 43 808 000)) from Highland Plumbing & Heating Supplies Ltd
sales[at]buyplumbingonline.co.uk
+44 1862808040 http://buyplumbingonline.co.uk/
Total cost 8.40 GBP and should fix two toilets.

steve
October 2011
can't thnak you eough for this pin prick tip which has finally put to an end 5 years of misery and dripping cistern!!!! now off to phone grohe to give piece of my mind!!

david strachan
September 2011
pin fixed the problem once i got access. will need new seals eventually. very helpful thread

JT
August 2011
I appreciate the advice as it has saved me purchasing a new unit... Amazing what a pin can do!!!

Andy
July 2011
Thanks everyone, I have had this problem for weeks, finally managed to remove glass shelf and top without too much damage. Couldnt work out why the cistern was letting water by after I had taken everything apart and then put it back together, then went online to ask the question, found you guys and solved the problem as I had blisters, which I have now pierced. Put it all back together and everything is now fine. Thanks for all the advice.

Jamie
June 2011
Prick the pimples - it works. Dreadful design, it feels like it will snap in your hands when removing the holder for the bellows.

Apart from a grumbling noise when it fills, its been 2 hours since the cistern did a top-up, compared to 15 minutes before.

Thanks everyone !

nmit
April 2011
I have had the same problem with my built-into-the-wall Grohedal cistern for many years. Sometimes opening the front cover by removing the two screws underneath it and then fiddling with the parts inside the cistern, as well as adjusting the length of the plastic rod that activates the flushing mechanism, helps but not always. I'm about to buy a new cistern that has a simpler mechanical design and is easier to adjust and to repair.

Avner Falk
April 2011
In our apartment block of 16 units, at least 6 cases of persistant leakage were caused by blisters developing on the valve seals. All gave rise to large water bills ecause of metered supply; one of £1,600 more than usual. Pricking these with a pin will generally mitigate the problem

Lyn
January 2011
I would like to thank Rex for the very helpful answer. I did exactly what he said in his post and have completely stopped the leaking. It took me a long time to get the actual plumbing bit back together but it works. All down to the accumultaion of limescale on the valve seat.
Thank you

Christine
October 2010
Easy to solve no parts needed. Open the cover on top of cistern turn off water at manual valve on right in top of cistern Pull clear plastic air flush tube from top of flushing unit unscrew right side of water feed tube has a curve in it unscrew left side of feed tube filling assembly slides out of left side on red horizontal plastic clip remove tube leave float assembly in left chamber for a moment,remove cantilever lift end up and pull out of dimple remember which way is up.Remove belows from top bracket of flush unit note the legs sit over the top edge of the piston.Lift out the piston.Examine the plastic seal on the bottom and remove lime scale deposits by immersing in Brick cleaner from builders merchant orB&Q use a plastic bucket.ten mins and as new rinse as its acid and burns hands rinse with plenty of water. Now you need to descale the seating that it sits in at the bottom of the cistern.Make a plug from a parsnip or such and bung up the tube to the toilet bowl Pour the brick cleaner into the cistern so that it fills the female seating area around the parsnip allow ten mins and remove bung rinse and feel for any remaining lime scale if clear refit all the bits .The piston just sits on the base it doesnt need to be clipped in.
If this is beyond you call a plumber and dont winge about the £100 bill he deserves it in spades this is the worst flush design in the whole world to work on.Rex the Plumber Dorset

Rex Farndon Advent Installations Poole Dorset
September 2010
Just to say thanks you - same problem, and once I realised that the whole assembly come out of the cistern by simply unscrewing it, I was able to prick those bubbles in the washer surface and put it back. Still some small leak, but not enough to bother me.

I still could not see how to disassemble the thing, but hopefully will not need to.

Many thanks agin to all who posted here and saved me a bundle of money.

Rob
September 2010
the valve on the cistern may need a new seal - mine is just the same ansd I bought a new float for it thinking it was that .
Part from web site - http://www.toiletspares.co.uk
Product Name : 43544 Grohe Discharge Piston and Seal Product ID : ts147
Product Price : GBP 9.85
Quantity : (nos)


43544 Grohe replacement discharge piston & seal for all grohe single flush valves. Price includes P&P to UK Mainland.

billy
September 2010
had exactly the same problem. Leaking into the bowl for several months and getting worse. Found the same water blisters on the white seals. Followed suggestion of puncturing them with a pin. now it seems Ok. Will still attempt to source new seals but hope they have found new compound for them so they don't absorb water.

Dan
August 2010
Finally got to the valve today it looks just like the one at http://davidnoelbrown.blogspot.com/2008/05/grohe-dump-valve.html

There are two white rubber seals one near the red plastic, the other smaller and only visible when you turn the red plastic on the dump valve 1/4 turn anticlockwise.

Both were full of water blisters. have burst them all and put it back together. Result is that instead of refilling and flushing every 40 seconds I am now at 15 minutes plus and counting!!

Will need new washers as very slight continuous trickle visible in bowl, but vastly reduced from before. Other Grohm cistern has no trickle whatsover.

Philip
August 2010
I have just tried to solve the same problem on my brother in law's cistern. I believe the continuous trickle is caused by water by-passing the syphon and discharging into the bowl. Until I manage to get full access to it I do not know how to solve it. I will keep you advised; if I remember. As a check for the fault listen carefully, and in time, you will hear the ball valve open and close for a few seconds to replenish the cistern. When I have pulled the bathroom furniture apart I will have better access and I will have it to bits.

David Linton
August 2010
Got much the same problem as others on this page. Got the front plate off and the valve out by quarte-turn anticlockwise. Where is the seal? What colour is it. What I have got out is all white plastic - do no have black and red bits show on

http://davidnoelbrown.blogspot.com/2008/05/grohe-dump-valve.html

What should I be looking to replace?
Thanks for any help.
Rory

Rory
July 2010
I have tried to remove the 4 bolts on my Grome inset cistern to get at the valve, but the bolts just keep rotating anti-clockwise and not undoing.

Is there something I am doing wrong?

Regards

Philip

Philip
June 2010
Mine had been leaking years and had caused bad limescale in the bowl from the constant leaking. When I took it apart it too was a blistered seal. I have requested one from Grohe UK.

Kev, yes easy to replace from above. The plastic that holds the plunger (from the button pipe) unclips by leavering each side in the middle and sliding up. The whole plunger unit just comes out. A 2 minute job once you have the top off.

Stu
March 2010
ps can it be repaired easily as i only have top access to the unit and really dont want to break the tiled frontage. thanks again

Kev
March 2010
Hi,

i have a Grohe EAU2 concealed that keeps filling and overflowing into pan. Only 18 months old. Loads of answers on this page, but too confusing for me. Can someone give me a straight forward answer. I have emailed Grohe today and await their reply, but i feel its a manufacturing fault judging the amount of threads on here. All help greatly appreciated.
Thanks

Kev
March 2010
Hi Alastair, and any one else with the same problem. If the flush plate is on a vertical wall behind the toilet all you have to do to remove it is to push it up hard from the bottom edge and then while still holding it up, pull the top edge forward away from the wall.
This is true for my system which is a 10 year old DAL single push button.
This will uncover the actual flushing system. This consists of an adjustable length pushrod that inserts into the front plate push-button. This in turn pushes down on the flushing mechanisim. If you get to this stage you will have to remove four screws that hold the main plastic frame to the cistern, and then lift off the whole internal unit, at the bottom of which you will find the offending blistered silicon washers! Good luck, mate.

Maltese
January 2010
Have had leak for months new valve is about £26. However I had disassembled the valve by twisting lower locking ring and found the blistered inner seal Then punctured the blisters with a pin. Reassembled valve and now no leaks. Thanks for advice on site (Puncture Blisters)

Tony
January 2010
I have had the same constant drip into the toilet bowl from my DAL single push button flush system with a concealed cistern for some time. I have now solved the problem by changing the 2 silicon washers as described by many helpful people on this page, including a photo by MasterCheif at http://snipurl.com/grohe. The old washers had about six dimples on them. THANKS GUYS! I managed to locate the local spare parts supplier for GROHE and they actually stock, or can order, parts for the older DAL system. They actually had the 2 silicon washers in stock (€3.50), part number 43808000. The old washers had dimples on them as described. No more drips with the new ones!

Maltese
January 2010
I have a concealed cistern with a Grohe flush plate. There is a constant trickle of water into the bowl after flushing. I would like to look into the cistern but don't know how to get the flush plate off. Any ideas?

Alastair
January 2010
Amazing. Mine had been leaking for ages and would keep me awake on a regular basis. Thanks for the help guys.

Paul
January 2010
This problem of trickling water into the toilet pan can be one of 4 things and is easily diagnosed.
Look into the cistern and if the water is going over the top of the mechanism into the overflow, then the filler valve is not cutting off the water. This is either due to the float being mal adjusted which can be adjusted by turning the plastic cross headed screw to set the water level. If adjusting does not stop the flow then there is a small diaphram inside the filler valve that needs replacing.
Now - - - if the water is not flowing over the overflow then the problem is caused by the flushing valve not seating properly. This can be caused by debris in the valve. To sort this out simply lift out the central flushing valve, in some models this needs a quarter turn anticlockwise, then pour water from a jug or kettle of water down into the cistern to clear the debris.
While you have the flush valve out, check the seals on the valve and if damaged replace using the Grohedal spare part 43544. Simply yank the old one out and replace by pushing the new one in.

tonzooneill
October 2009
A really useful chain of info.

However my problem is related but not the same - and there appear to be a whole load of you with some experience

My problem is when you push the button (s) in, the water flushes - sometimes a lot, and sometimes a little (though a pumping motion helps) but it stops as soon as the button is released.

I'm guessing I need a new mechanism. That's easy to get - but how easy is it to get the thing out. Like others, my b***dy builder tiled in the cistern. If I have to break the tiles and put a hatch it, its serious bucks.
I can get my hand in if I take the button off. is it possible to lift out or unscrew the mechanism easily (and replace it)
I'm really trying to avoid damaging the tiles.

the good news - it doesn't leak!

Thanks

Mike
October 2009
As per the thread below, see www.showerspares.com

Mack
October 2009
Where can i get a part 43544 without too much hassle

Mike Reardon-Harman
September 2009
Our Grohedal has leaked since we moved in and we've just returned from holiday to find it a "flow", with the toilet not flushing.

I don't do DIY but found this site and "broke in" to the sealed unit through the push button mechanism.

The cause of our leak/flow wasn't the mechanism - it was simply that the piece of plastic that the push button pushes against can be altered in length by screwing it (winding actually) in and out of it's socket. By screwing it further in - it was no longer constantly pushed up against the push button which was the cause of the constant leak that became a flow. This was the simple solution I hadn't expected!

Craig
August 2009
I phoned Grohe customer services in the UK and spoke to them about the problem. - they replaced the part free of charge within a coupleof days as the toilet was less than 5 years old and had a 5 year guarentee. - I have 3 toilets the same and when the second one went ( about 3 weeks after the first they again sent out a replacement free of charge - I advised them that I had 3 toilets and they sent out a third unit at the same time just in case that also failed)

chris
July 2009
I am another person with the same problem you all describe. The silicone washer was covered with blisters
which I burst. This did cure the problem, for how long, who knows. I see no point in purchasing a new valve unless the unreliable washer material has been modified, which some suggest has been done by Grohe. The next time it happens, hopefully not too soon, I will make a washer as at least one other correspondent has done and hope it works. To my mind, the design of the mechanism is such that the washer can make a less than perfect seal at the outlet due to the light weight of the mechanism containing it, therefore a very very slight leak is always possible even with a good washer and this can only get worse with blisters or lime scale etc.

Ted, Hertfordshire UK
June 2009
Ian im from the portsmouth area, what bathroom store is yours? and do you seel the new seals to stop the leaking of water

John
June 2009
I replaced the "Grohe DAL 43544 - Discharge Piston" to cure this problem around three years ago on a little-used toilet and that was OK.

Now it has started leaking into the pan AGAIN so I bought another replacement piston (from www.showerspares.com) in April 2009 - but it continued to leak.

Having dismantled and reassembled it several times in the past two months I have now got the point where it still does leak slightly but only until I nudge the very top of the "Grohe DAL 42137 - Single Flush Valve" tube (the overflow tube) to the left and it will then stop leaking! But I have to do that on every flush!

Would be most grateful for any comments on this please?

Mack
June 2009
Thanks for all the info. I had the problem of the water trickling into the pan all the time. Replaced the Piston ( 43544) as suggested and works fine. Obtained part from National Shower spares in 24 hours by post, excellent. Fitted it in 5 mins, and I am normally a nightmare with plumbing!

Ian
May 2009
i am a owner of a bathroom store the problem has been around for years we were advice it was bleach damage to the washer causing it to blister but i think its the hardness of the water we work in portsmouth area. the old cartridge you had was green with the washers in.the new blleach friendly washers are in a white cartrige hopes this helps

andyhoskin
May 2009
WOW - the advice works - I managed to take the push button, plastic frame behind push button and plunger out of cistern. As described I found the blisters and burst them with a needle - not sure if it's water inside them as the contents did shoot out quickly or some other liquid glue etc.

Again as mentioned, I cleaned the plunger/ seel and then put the components back in reverse.

There is now NO WATER ESCAPING.

Do it - This Actually Works.

Danny B
April 2009
I didn,t think a Forum could go on so long about a very badly made WASHER (SEAL)....forget pricking blisters, the seal is perished....Knackered!! I made my own washer out of 2mm rubber...just use the old seal as a template...it now works perfectly!!! If you want to pay a tenner for a little sillicone seal washer...you must be MAD!!

Mr Swap
April 2009
Item arrived next day from National Shower Spares- excellent service - hopefully no more drips. Colin.

Colin
April 2009
Having read all this correspondence, I realised that I was not alone with this problem, I pricked the flange and reassembled but the drip continued so I emailed Grohe, they replied within an hour with supplier and part no (no offer to supply free). They do say that
"the material to make the seals has been changed in current models"
The supplier of part No.43544 they suggested was "National Shower Spares" on 0845 126 4141, they have plenty in stock as the demand is there!!!
Cost is about £10 with part and postage.
Good luck!

Colin Pook, Dorset UK.
April 2009
thanks for the tip.Iv"e found little water blisters on both washers in the Grohedal flushing unit with the green base.
Pin them out, it does work.

M.Clarke.
February 2009
I have the problem of water very slowly leaking into the toilet pan - causing the water valve to vibrate, as it fills the cistern. I have three of these cisterns and have fixed one by putting a new siphon in . I have just discovered the replacement piston Part number 43544 , which I can use to fix the others. Any ideas why the filler vibrates - its a kind of oscillation as it tops the cistern back up ?

sean
January 2009
My problem is the overflow into the cylinrical part of the Grohe unit and so it constantly tricles water in the bowl. I also took the unit partially out to see the bottom plastic washer, but did not find any blisters. Anyway I don't think in my case the problem is incomplete sealing, I think it is to do with, may be, stop valve not working properly, and hence the overflow. The other interesting point I will like to add is that the unit can be just twisted anti clockwise a little to come out!. Any suggestions how to fix the overflow in my situation?? Thanks

Ash
January 2009
Well just so you all know I contacted Grohe Customer Services in the UK. They were very helpful and admitted they had a problem with some concealed cistern units that had a green plunger with Grohedal markings.

They are sending me two redesigned plungers to replace the faulty ones free of charge.

Must say I was pleasantly surprised. So my advice is ring Grohe customer services.

Neil M
January 2009
This is great and thanks to all. I have two cisterns with this problem and have tried lots of things to stop them dribbling. I ended up replacing one with a complete new unit! At least I now know I can get just the relevant part to fix the other one. However surely this is a design fault and as such shouldn't GROHE be replacing these parts free of charge? Has anyone tried to contact GROHE directly?

Neil M
January 2009
Part number 43544 from National Shower Spares cured the problem. It comes complete with both washers.

V96GLF
January 2009
Yes, what a strange design! - I also have experienced the unit not seating properly , make sure the rubber washer and the base where the washer sits is clean . Sorry, don't know about replacement of this part.
I am still trying to find someone to supply the membrane 43733.
"Is it right that the entire unit just sits quite loosely on the bottom of the tank? It seems strange that there is nothing bolting it down..."

Hugh McNair
January 2009
I've got the same problem. Found a couple of pimples on the inner washer, but pricking them hasn't fixed it.

Is it right that the entire unit just sits quite loosely on the bottom of the tank? It seems strange that there is nothing bolting it down... although if there was then it would be impossible to remove in a concealed unit!

Are there equivalent units from other manufacturers that would just drop into the same mounting? This one for example:

http://www.diy.com/diy/jsp/bq/nav/skins/popups/scene7.jsp?skuId=9304827

...but I'm worried that it might not simply drop into place.

V96GLF
December 2008
I have the adagio concealed cistern with the fill valve part 42181. Can anyone help me find a source for the membrane 43733?

Hugh McNair
December 2008
Thanks guys, I have been suffering the same problem whereby I have been getting a small continuous flow of water into the bowl when the cistern is full. I removed the remote control air bellow and just lifted the complete flush valve assembly out and bingo, there were the little blighters .... about half a dozen water blisters around the white plastic seal. I carefully pricked them with a pin and you could see a minute drop of water come out. I coated the seal with a fine smear of Vasoline, put it all together and the problem is now fixed. Many thanks

Rod Wicks
December 2008
I have the same issue as do my neighbours with Grohe concealed cisterns. (Compounded by the developer grounting in all of the tiles hiding the cistern - with no access panels!).

The plunger seal has blistered. I have found 3 sources online for replacement spares:
cheapest I found:
ebay shop: "showershack". Search under shop names.
£7.50 + £2 postage.
also: www.showerspares.com/products/spare_parts/grohe_dal_43544__discharge_piston

also: www.onlineplumbingsupplies.co.uk/acatalog/Toilet_Cistern_Spare_Parts.html

Hope this helps.

Fraser
December 2008
There probably isn't grit in it but the transluscent disc that sits on the 'knife' edged rim at the base of the unit has probabaly developed small water filled blisters which prevent it from seating properly. A temporary cure can be effected by carefully removing the blisters and smearing with vaseline. It just amazes me how such a critical component has not been better researched and manufactured - it's a bl**dy nuisance and I still haven't been able to identify a spare part. I'm very glad that Grohe don't make aeroplanes!!

John Sullivan
November 2008
Hi bud I have the same problem on a villeroy & boch toilet siphon, wait for it made by Grohe?? not one toilet but two! both failed at the same time.

Im the plumber sent in to fix, I have punchured the blisters about 15 of them, but think the seal has had it still leaking, but thanks for the tip on how to replace this washer, will try that next (do grohe supply seals)

onefitzy
November 2008
I have a similar problem but would like to ask if you guys think it's the same solution.

What I'm getting is that the water isn't shutting off when it should. You flush the toilet, the cistern refills but rises past the shut off level. Water rises and trickles down the outlet pipe into the pan. It does shut off eventually (so far!) and once it does no more water trickles into the pan, but I suspect this is a problem that isn't going to get better if not dealt with.

Any ideas?

Dave
November 2008
Hi all. in my situation it keeps filling so I tyhink I need to replace either filling valve or just a plastic tube which is part of filling valve and as I think is used to balance pressure. However I checked both filling valves quoted below and mine doesn't look any similar at all. Does anyone know where I can find other types of grohe filling valves please?

Val
October 2008
I have same problem, however I am not clear how you can prick a water bubble and where the washer involved is.

If someone could show where this is that would be great cos it seems most people here have the answer - but i can't see how to implement it...

also, i have mine in a unit which has worksurface on top, so taking the facia off i can see only the front and have about 2 inches clearance on top of cistern between it and the bottom of the rolltop. Will i still be able to get in there to do this?

Finally, i think this is not two issues, as a constant leak into the pan will cause the cistern to refill every 15 mins or so.

Dave M
October 2008
I had exacltly the same problem, started 3 days ago, trickle into the pan. Cistern 5 years old. Thought I was the only one until I found this website. I managed to purchase a replacemnt bottom dump valve Grohe part 43 544 000 from my local distributor.Bathroom World in Darlington Co Durham WWW.bathroomworlddtn.co.uk who were most helpful. Cost £5 . Took me 15 miuntes to fit. Job done.
All thanks to the information on this website. Intend to follow up with Grohe next week.

joe
August 2008
Just want to say thank you for pointing out the pimples.I suspected that they were the problem but didn't realise pricking them with a pin would do the trick

Peter
August 2008
This thread is talking of two issues by the way.
1) Trickle into pan. Where the solution is to replace plastic valve or pierce bubbles in valve seat.
2) Cistern filling all the time, where the solution may be to replace the filling valve. I have not had that problem and can not comment.

nerak99
August 2008
Just to add to the above. I had the continual trickle into pan issue.
To access the valves, I had to remove the chrome plate (push to right and pull forward). Then the bezel that holds the plate. (Four long brass screws) and then the inner plastic frame (pull forward to release two plastic springy lugs). The button link just comes off which is a bit alarming but it is meant to, it just sits on the flush valve.
I reached in and lifted the valve which has a the flexible plastic seal. This has the problem of the bumps which I used a pin to pierce. It seems to me that the plastic is gradually delaminating.
I put the whole thing back together and it works.
I have sent a message to Grohe customer service to see what they think!

nerak99
August 2008
If the cistern just keeps filling, then you would need the filling valve. There are two types - one with a 3/8" connection (which has a brass connection, part number 37095) and 1/2" (which has a plastic connection - part number 42181). This would solve the problem.

They cost approximately £25 including the VAT. You can purchase these through National Shower Spares on 0845 126 4141 or at www.showerspares.com. Hope this helps.

National Shower Spares
July 2008
For anyone wondering about the pimple, I've uploaded a photo here: http://snipurl.com/grohe

I've just pricked this with a sharp blade and cured my slight flow problem.

MasterCheif
July 2008
We have had exactly the same problem, when stripping the flushing mechanism, we noticed that the washers had many pimples. We pricked them with a pin as suggested and hey presto, we now have a fully flushing toilet. Thank you so much for the advice listed!

Chris & Amanda
July 2008
Just to add my thanks to Mark and Paul etc. Found exactly the same problem with the bubbles in the plastic. Also to give Grohe customer services credit, I had already called them about the problem as this is the 2nd cistern to fail in my house and they have sent me a replacement unit by next day delivery without any fuss

Andy

Andy
May 2008
Hi Norman. I think there is room for a little confusion here.

It seems to me that you are talking about the diagphram washer on the inlet to the cistern (the blue and red inserts relating to the high and low pressure versions). the problem here being that the cistern keeps filling, never completely shuts off and eventually overflows with the overflow running into the pan.

The other problem that seems to occur with these is that the flush valve doesn't seal properly and water from the cistern leaks past into the pan, as the level in the cistern falls the inlet opens and the cistern refills.

The difference is that in one scenario the cistern overfills and in the other it doesn't.

Your solution seems to be for scenario 1 - inlet, but I cannot tell from the other responses which if any refer to scenario 2 which needless to say is the one I'm takling!! Can anyone explain that flush valve to me!! See also http://www.screwfix.com/talk/thread.jspa?forumID=25&threadID=43395&messageID=442304

Neil
April 2008
It's me again...a point I forgot to put on my (November 2007) exposition and it particularly applies to persons who have replaced the silicone 'stop' and water continues to flow for a short time into the toilet bowl: be sure that when you reassemble the washer parts you line up the red plastic rectangular bit with the NARROW slot! If you line up with the 'wide' slot you will allow water to creep into the bowl at each flush. Let me bring all you guys up-to-date with my running repair that was previously explained. We are into January and my repaired silicone seal with the added silicone 'band' sealing the hole is working perfectly !!! I have a replacement seal awaiting, but why bother?

Norman, Canberra, Australia 11 January 2008

Norman Knowles
January 2008
Thanks Paul,
I had the same problem and noticed the blisters on the washers, abot seven of them.
I pricked them and put it back together and it really does work.

Barry
December 2007
I have the same endemic problem with Grohedahl back inlet valve washers. I asked to GROHE France which parts I have to replace to fix it. May be the silicon washers ?
I am looking foward to having news from GROHE
François

François BOURREL
December 2007
I too had this problem, I contacted Grohe via their web site and they sent me a replacement part free of charge. You might want to try the 'I was lead to believe I was purchasing a quality product' tact

Part time plumber
December 2007
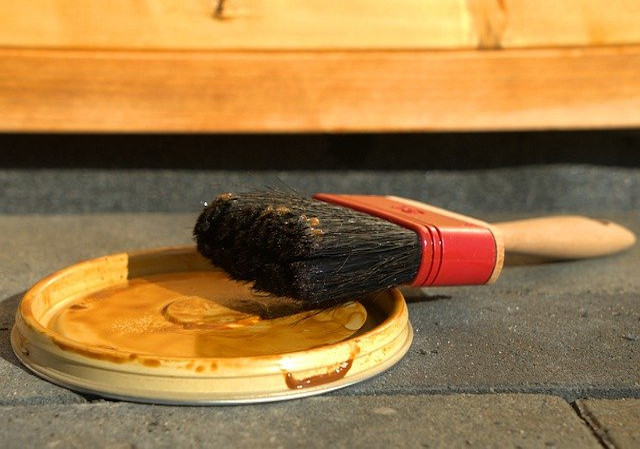
This is an endemic problem with Grohedahl back inlet valve washers. For those of you in Australia, they are supplied by your plumbing supplier through Argent based in Brisbane and cost $9.00 each. It is Argent Part Number 43733. (Don't let your supplier sell you the whole assembly that costs more than twice that amount.) Of course, it's very poor design indeed: the washer needs to be of much thicker silicone rubber than it currently is. I have thought about this problem for years and finally found the solution, I think. I don't know much about the 'pimple' experience. My problems have always been a small tear in the silcone rubber 'dome' washer which houses the red (in my case) or blue solid plasic insert which does the actual sealing. The silicone rubber washer tears, of course, with the repetitive movement backwards and forwards of the solid plastic insert. At the moment, I have a badly torn silicone rubber seal that I repaired with Selley's Marine Sealant. A small tube costs around $11.00. It cures in 24 hours. And its been working perfectly for well over a week with no sign of leakage whatsoever. So, what I suggest you all do is purchase a new washer and run a bead of Marine Sealant around the first 'step' in the washer - that's the only part of the washer that can fail as far as I can judge. With that added silicone 'bulk' at the very point of stress, I see a very extended life for a new washer. I bought a new washer, but my Marine Sealant-repaired torn washer is performing so well that I shall leave it on. In the meantime and subject to comments below, I will run a bead around the first lip of the new washer and wonder when I might need it!

But there's small catch with what I propose... Selley's Marine Sealant once opened is impossible to extract from the tube even though it will feel soft within the tube and despite tight replacement of the top (in my case) within one (1) minute. I rang Selley's Technical Assistance (Charlie) and he affirmed that it was a 'tube problem' that Selley's recognises, but haven't yet pinned down. I was able to fix my torn washer with a minute amount before the problem emerged. It was when I went to run a bead around my new washer a couple of days later that the problem emerged. I took the tube back to the seller (Magnet Mart) and received a full refund. And here's a laugh: after relating my experience with the tube and my conversation with Selley's, a young man at MM thought 'I'll sort this out, no sweat'. After all, there was the tube full of 'soft' sealant. So, off with the screwtop, applied all his weight, burst the tube at the bottom, covered the counter with Marine Sealant and, with an amazed look that I shall long remember, realised that not a single bit had come out of the top!!!

Finally, it might be that something like Gutter and Roof Sealant is sufficiently strong. I can't see why not. The purpose is simply to 'bulk up' the stress-prone silicone rubber.

Good luck to all 'back inlet washer fixers'
Norman

Norman
November 2007
Forget about fixing this device. I tried everything including replacing the silicon washers, and the leaking never stopped. finally I replaced it with something less sophisticate, but it seems to be working without any leaking.

Avi Zahavi
November 2007
i have found that the silicone seal in the cistern unit degrades over time and stops the seal. i have been told by grohe that you have to replace them.

pam newall
November 2007
I had this problem 2 years ago after it had been in service for only 2 years and I had to fit a complete part containing the washers. ( the washers are not sold separately )
Now it's failed again so as there are no bubbles in the washers I guess I will have to purchase another insert ( part 43 544 )
Look like this is a good moneyspinner for Grohe

Bill Clark
October 2007
I had exactly the same problem.... I was scratching my head until I spotted the little blister on the inner washer. I burst it with a pin and that fixed it. Sounds like a problem that this make of flush suffers from.

Paul
July 2007
There are 2 silicon rubber washers in the flushing mechanism. On my machine water has got into one of these washers and raised a rather nasty looking pimple which is stopping the washer from sealing.
A fix which has worked for me is toprick the pimple with a pin to release the trapped water.
If you are dismantling the washers make sure to refit them in the correct orientation. The side with writing on must not mate with the part forming the seal. You will only get a complete seal if the smooth side is used to seal.
I ripped out a perfectly functioning 70 year old cistern to replace it with this junk. Imagine my dissapointment!

Mark Spicer
June 2007

Automatic Answer

While you wait for answers, we may have found some information which could help you.

Click here for Cistern Grohedal Water

Mend D.I.Y, Toilets
Free repair help for Grohe toilets

How to mend ...

Find out how to mend just about anything howtomendit.com for free repair help, information and advice.
Mend D.I.Y, Toilets
Free repair help for Grohe toilets