Sophie & All,
Every time I read or hear someone tell someone else how to re-set a violin bridge, I am amazed at how much they don't tell. I don't know if this is because it all just seems so intuitive to them and they assume the person who is asking how to do it will just know all of these things, or if the person telling how to do it just doesn't really know how to do it themselves.
I will try to explain it in enough detail so that anyone who knows absoulutely nothing at all will be able to properly install a bridge.
First inspect the bridge to be certain that it is not cracked or broken. If it is damaged, replace it with a new one. Even the best ones are cheap and it is not difficult to "lightley" sand or file the feet to match the curve on the face of your violin and adjust the height to ensure the strings don't "buzz" on the fingerboard and are the right height to provide however much "action" you happen to prefer. Remember: more height, more action; less height, less action. Experienced players often prefer more action and students and new players usually prefer less action, but don't trim it enough to get "buzz". Use the old one as a rough guide and starting point.
Also, make certain the sound post is still in place. NEVER, NEVER, NEVER ever put a bridge back onto a violin that has had it's sound post fall out or been removed. THIS CAN/WILL CAUSE SEVERE DAMAGE TO YOUR VIOLIN. If the sound post IS NOT in place, take your violin to a reputable voilin repair technician or luthier and have it replaced and properly positioned for optimal tone and volume.
Your bridge by can be easily replaced by placeing the violin in your lap with the tailpiece against your stomach and the scroll between your knees. Slide the bridge under the strings and slowly raise it back into position using your thumbs and forefingers, makeing sure the strings fall into the little notches they were originally in.
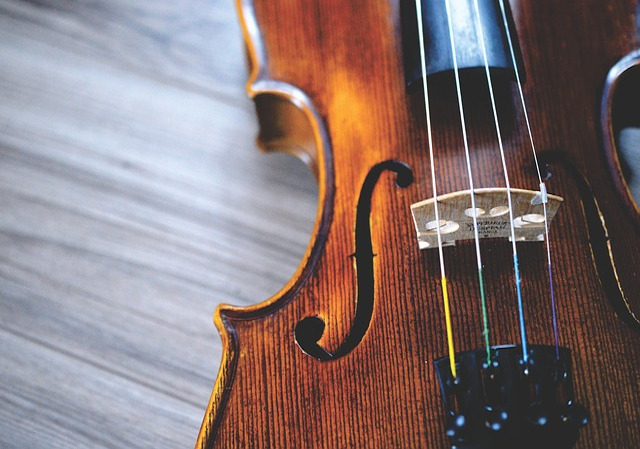
Before doing this, check the bridge to be certain you have the front and back correctly aligned. The top of the bridge has an arc which is taller on one side and shorter on the other. The taller side is placed under the G string and the shorter side goes under the A string. If you hold the violin up by the neck with the tailpiece end hanging down, the G string is on the far left and the A string is on the far right when looking at the front (or top plate) of the violin. The side of the bridge that is faceing the tailpiece is flat and the side of the bridge that is faceing the scroll, neck, fingerboard will be slightly curved.
Once the bridge is in place, adjust the strings until they are "in pitch" but not "in tune" (flat, not sharp). This is usually tight enough to hold the bridge in place yet alow you to move it into proper alignment without damageing anything.
Now, use a very flexable straight edge and lay it under the strings, below the bridge (tailpeice side) and aligned so that it shows a straight line between the points of the triangle cuts on the inside of the two f holes (the triangles that point towards the center of the violin, not the triangles that point to the outsides of the violin). I have a very flexible stainless steel office ruler that has cork on the back side which works great and does not marr the surface of the violin.
Slide the bridge back to the edge of the straight edge so that the back side of the bridge (tailpiece side) is directly in line with the POINTS of the f hole triangle cuts. (There are people who will argue with this positioning of the bridge, but it IS the most common alignment. Later, you can make minor adjustments of this positioning if it suits your ear, but this alignment almost always provides the best positioning of the bridge for both volume and tone.)
Next, measure the distance between each f hole and the foot of the bridge that is nearest to it. Position the bridge to be equal distance from the point of the inside triangle cut of each f hole, or dead center between the two.
Now, look down the back side of the bridge and make certain the bridge is leaning just slightly towards the tail piece. Remember, this is the flat side of the bridge faceing the tailpiece and the curved side faces the scroll, neck, fingerboard.
Now tune the violin, starting with the G string and moveing to the D, A and then E string. (Some people will tell you to tune G, skip D, tune A, then E and back to D. I just think that's stupid and is just something someone made up to sound like they something that you don't. IMHO.) You will most probably have to do this several times because each string that you tune will go out of tune as the next string is tightened and brought into tune. This is normal and I usually don't even mess with the fine tuners until I have brought all of the strings up to the point where I can't get them any closer before I bother with the fine tuners.
Before you do the "final" tuneing, check the bridge again, this time by slideing the end of the straight edge or a credit card along the back side (tailpiece side) of the bridge until it touches the face or front of the violin and make sure it is square on "that side". Remember that the front side of the bridge is curved and when you look at it from the side, it will have the "appearence" of leaning towards the tailpiece, but the "square" straight edge or credit card placed on the tailpiece side of the bridge will confirm that, "that side" of the bridge is straight up and down.
Lastly, check everything. Place the straight edge across the bottom (tailpiece side) of the bridge and be certain it is in line with the points of the two inside triangle cuts on the insides of the f holes. Re-measure the distance between each f hole triangle cut and the corresponding foot of the bridge and be certain they are exactly the same. Make certain the tailpiece side of the bridge is square to the face of the violin. And...
Last, sight down the length of the strings from the bridge to the neck and be certain the distance from the lower corner of each side of the finger board is exactly the same distance from the G string and the E string. THIS IS IMPORTANT! If the bridge is exactly centered between the inside triangle cuts of the f holes AND the distance from the lower corners of the fingerboard and the G string and the A string are not the same, something is "tweeeked" and now you must make a judgement call as to how to "split the difference". If they are exactly the same, congradulations, but if not, then you have to make a judgement call. I make this decision based entirely on how the strings feel when I finger them with my left hand while playing. IMHO, that is more important than perfection everywhere else. Move the bridge EVER SO SLIGHTLY to one side or the other (towards one f hole or the other) to get this where it feels best for you, WHILE MAINTAINING ALL OF THE OTHER ALIGNMENTS. Remember, the G string is "higher up" off of the fingerboard than the A string due to the curvature of the bridge, so you must place your ruler under the strings from corner to corner on the fingerboard and "eyeball" the measurement.
One last final check of the tuneing and YOU ARE NOW FINISHED.
As time goes by and you play and tune your violin, the bridge will be pulled by the strings so as to lean towards the fingerboard and away from the tailpiece. When this happens, just lean it back towards the tailpiece again and use a credit card or ruler to check that is is again square to the face of the violin on the tailpiece side of the bridge.
After you have done this a time or two, you will realize that it is A LOT EASIER TO DO, than it is to write about or even to read. It seems like a lot of things to do, but after a few times, it comes quickley and easily, and it will soon be so natural a thing to do, that you too will forget to tell the next person who asks, all of the little details that make for proper installation of a violin brige. Well, hopefully not.
Good luck,
Barry
Barry
April 2010

 howtomendit.com for free repair help, information and advice.